Monday, March 10, 2008

Creating Stunning Monos 3

Contrast increasing using USM

The unsharp mask [effectively a high pass filter] is used to sharpen and image, something the name does not suggest, sharpening will help to emphasize texture and detail, it is a crucial part of the editing process especially in monochrome work, this tutorial is based on using Photoshop.

USM sharpening works by using a slightly blurred version of the original image, this is then removed away from the original to find the presence of edges, using the USM filter increases the contrast giving the look of a sharper image, in this tutorial I will also show how USM used at higher than normal amounts will not only appear sharper with better contrast but will make the image pop so to speak and bring out detail, it is best used selectively using layer masks to give greater control within the images, a word of caution, if over used it will increase the pixalization and give haloing to edges, do experiment with the settings and and when using your brush tool vary the amount of opacity when painting back.

This example is an untouched image straight from Raw image with no USM applied


This is the converted image


Now look at the sky and foreground on this image, it lacks contrast and is flat looking.

In the Photoshop dialogue box below I have set the Amount to 68, Radius to 50 and threshold 0, but as said previously do experiment, next you need to copy the image by pressing Cntrl J and have two layers present in the layers palette as shown.


Here's the USM applied at the settings above, you will see the image now looks over sharpened and has accentuated the edge contrast to much resulting in halos especially where dark pixels meet light, plus added pixel clumps are now present in the clear sky region.


The next part is to apply a layer mask by pressing Alt on your keyboard, keeping it depressed and clicking the add layer mask icon in the layers palette, this masks the USM effect out, we need now to paint back the effect using a soft brush with the foreground colour set to white in the tools palette, remembering to avoid painting where light to dark areas meet, on the white clouds I have used brush opacity at 100% and not applied it to the blue area of the sky or the middle foreground trees and houses, if USM was painted to those areas it would start to "block" the shadows up and give a blotchy appearance in the plain sky, if any white areas start to bleach out just change your foreground colour to black and carefully paint the USM out, or you could lower the brush opacity by 50% in those particular areas.

Here's the image with USM selectively applied as described above


The next part will be to open the shadow regions using levels, move the middle slider to the left to open the shadows, then add a layer mask to hide the effect and painting back the lighter areas where required, flatten the image, open levels again, darken the blue sky area by moving the middle slider in Levels to the right, add a layer mask and paint back the darker area.


The final stage is to apply USM to all the image at a low amount but same radius IE : amount 14% radius 50% threshold still at zero, plus adding a touch of Dodge and burn to further enhance the contrast.

Here's the finished result, as you can see only three types of edit used, [I]USM, Levels plus Dodge and Burn,[/I] the image now has four important elements to achieving a good black and white image, contrast, clean whites, deep blacks and texture.

Finished image

Creating Stunning Monos 2

Sky Editing plus Channel Mixer settings to imitate film responce

Sky Editing

For me huge and important part of landscape photography, how many times do we see a great picture with nice land features but no control in the sky areas, bland, blown highlights and featureless, well there's ways around this and in this short tutorial I will show you how to achieve dramatic skies that will improve the look and impact of most landscapes.

Importantly the exposure must be right when the shot is taken as blown highlights are virtually impossible to retrieve, so control at taking stage is of paramount importance, the colour image below was taken in Raw and I used a grey graduate filter to reduce the contrast.

The first image below is unedited in the Photoshop raw converter, as you can see the exposure has given a nice tonal range but there is a slight over exposure between the trees and the white balance needs correction.


In the example below I have made corrections to get the colour right as this is important in BW as much as in colour work, because in conversion we will be working with colour channels to get the desired effect,I have also made adjustments to the auto settings by reducing all the settings slightly to give a more saturated image, but made no adjustment to the saturation slider. The importance of working with Raw files can be seen as adjustments like this are easy to carry out.


Next the image can now be opened into PS for conversion, I used the Channel mixer to convert, settings as example below, I have used 100% Red for a more dramatic look.


This is the converted image with no editing to the sky apart from conversion, you might think this looks OK but theres more work to apply to it to bring out detail and contrast.


First copy the image then go filter~unsharpe mask, set Amount to 54 Radius to 50 and Threshold to 0, now the contrast has increased but their are problems between the trees with blown highlights and haloing to the edges.


Image with USM applied


On example three I have applied a layer mask by pressing Alt and the add layer mask icon in the layers palette, this will hide the USM effect, in the tools palette select a soft brush and make your foreground colour white, what needs to be done now is to paint the USM effect back avoiding the areas where the highlights have blown and the edge haloing has occurred.


You can see that in example three that the highlights have returned and no edge haloing has occurred.

To put a final finish to the image is subjective but I will darken the sky a touch by adjusting the middle gamma slider in Levels, add 20% more USM at the same settings set previously using the add layer mask and painting the effect back but avoiding the areas mentioned above, and then use the Dodge and Burn tools to selectively lighten and darken parts of the sky, when using the D&B tools the Dodge tool should always have the "range" set to highlights and when using the Burn tool the Range set to shadows,vary the brush opacity and its best not to go above 13% exposure for both, always work on a copied layer then fine adjustments can be carried out with the opacity slider in the layers palette, below is the finished image.


------------------------------------------------------------
Suggested Channel mixer settings

Here's a selection of settings to apply in Channel mixer to give colour response using different B&W films

Please note for newcomers using Channel Mixer the Ist number =Red channel 2nd number = Green channel 3rd number = Blue channel

Here's a selection of C/M settings to imitate film

Agfa 200X: 18,41,41
Agfapan 25: 25,39,36
Agfapan 100: 21,40,39
Agfapan 400: 20,41,39

Ilford Delta 100: 21,42,37
Ilford Delta 400: 22,42,36
Ilford Delta 400 Pro: 31,36,33
& 3200

Ilford FP4: 28,41,31
Ilford HP5: 23,37,40
Ilford Pan F: 33,36,31
Ilford SFX: 36,31,33
Ilford XP2 Super: 21,42,37

Kodak Tmax 100: 24,37,39
Kodak Tmax 400: 27,36,37
Kodak Tri-X: 25,35,40

And these basic ones:

Normal Contrast: 43,33,30
High Contrast: 40,34,60

Creating Stunning Monos 1

Multi Raw editing plus Dodge and Burn technique

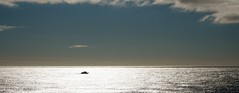
Multi Raw Editing
Under normal non extreme lighting conditions the modern camera of today will give a well balanced exposure for highlight and shadows, in some circumstances fill flash will also improve things further, but where flash is not practical editing techniques in your photo editing software will enable you to fine tune the exposure short falls in the highlight and shadow regions to produce a well balanced image. But there are times when in say landscape photography to produce a dramatic shot of the lighting manifesting itself in front of you, the only way to capture this is to shoot into the light this in turn presents a problem for your camera as to what exposure it will set in either manual or auto, what will happen is that it will generally be fooled by the brightness of the sky area and underexpose the image leaving the foreground with no detail at all or so little data that even adjusting the exposure slider in the Raw converter will not bring out the shadow detail needed, so a method of capturing both highlight and shadow detail is need to provide the right kinds of exposure to produce workable data in these areas, below is a detailed explanation of how to achieve this using two Raw images of the same subject but at different exposure levels, then using these to produce an image with both areas giving acceptable highlight and shadow detail. The images I have chosen as an example are ones of very high contrast in the sky area and a dark foreground, one that would be impossible to produce using one exposure.

Exposure

First it must be said that lens of high quality are better used for a shot like this as they will control flare to a minimum, set your camera on tripod or brace it so there is no camera movement, set your auto bracket to give, 1st/ auto exposure, 2nd/ minus 2 stops and the 3rd in the sequence plus 2 stops EV, once you have the images then the next step is on your computer.

My Multi Raw file editing technique
The images below is part of the AB sequence
Ist shot no compensation


2nd shot minus 2 stops EV


3rd shot plus two stops EV


From the 3 bracketed exposures I have choose images 2 and 3 for my edit, image 2 kept highlights in tact and image 3 with foreground shadow detail present, I did not choose image 1 as highlight detail in the central part had blown, "over exposed"

First for those not that familiar with Photoshop here is a guide to the main tools needed.


Masking and Levels

The first part of the process is to open the chosen images into the Raw converter in this example image 2 is the first, once opened fine adjust the colour balance~shadow areas etc then open the image into PS, now open image three adjust in the raw converter as necessary and open this image into PS, with image three as the active window go to select~select all, edit~copy, deselect and close the image, we now have one active image, go to edit~paste, the copied image is now pasted onto the active image you will notice we now have a copied layer in the layers palette, the next part is to add a layer mask, press Alt on your keyboard and keeping it depressed click the add layer mask icon in the layers palette the image is now masked and only the sky showing, now select a brush from the tools palette [soft brush] and with the foreground colour set to white paint the entire mask out to reveal all the image underneath the mask, now comes the tricky~skilled bit :-) something that requires practice and an idea of what you want the finished "mood" of the image to look like, change your foreground colour to black reduce the brush opacity to 50% and paint back the sky region taking care around the grassy horizon area [we don't want the edit to show here] use the brush as an artist would by varying the opacity to create a balanced overall look and not over processed, if you need to lighten an area just change your foreground colour to white and vica versa to darken, once happy with the edit flatten the image, when done the image should look like this.


Now one thing needs to be done before conversion to monochrome and that is to open the shadow regions and lighten the land area this is done by using levels, press Cntrl J to copy the layer, go to edit~adjustments~levels and pull the middle slider to the left to lighten the land area, all the image will be affected but we are only concerned about the land region, now as described above pres Alt~add layer mask, the levels edit is hidden by the mask, using the brush technique paint back the lighter areas to open the shadows the image should look like this now. Flatten the image.


Conversion to Monochrome

There are many ways to convert a colour image in Photoshop, my favoured method within PS is Channel mixer but i tend now to use a PS plug in called the imagingfactory I find this to be multi functional and more in keeping with conventional BW editing in the wet darkroom era but it does come at a cost, if you only convert the odd image I would use C/M but for the Mono enthusiast theimagingfactory is very good in this example I have used C/M as i think most newcomers to BW will use it, first press Cntrl J then go to image~ adjustments ~Channel mixer make sure the mono box is checked, now set Red to 100% Green to 0 Blue to 0 reduce the constant slider by approx -6 to darken the sky press ok, Alt add layer mask the image is now all colour use the brush tool to paint back the sky area only so your left with a mono sky and colour land and flatten the image, bring up C/M again but this time set Red to 0 Green to 100% Blue to 0, don't be afraid to use more than 100% green in fact I pulled this to 130%, press ok and flatten, the image should look like this.


Now we need to in increase the contrast I like to use the USM filter for this at high settings, some have said that to high and it is a destructive process but if used with care and selectively applied using the masking technique there is no better way of making the image pop, I regularly print out large images on Fine art paper that look great with no signs its been used other than the deep blacks, crisp whites and the contrast that's needed for most BW images, so Cntrl J filter~unsharp mask set it to this below.


Once you have applied it care must be taken on the pixel edges especially light against dark areas as haloing will occur but there is a way around this, yes the "add layer mask technique" we have been using previously, just press Alt add layer mask and paint back the USM "avoiding" the light to dark pixel edges that way no halo will occur, also use the brush at varying opacities, if full 100% brush opacity is used in the darker regions blocked out shadows will result [completely black areas that look bad especially when printed out] sometimes i use two passes with the filter for even more effect, this is a tricky edit to get used to but once perfected you will use it more and more on your edits it does need handling with care as over cooking it will result in a breakdown of the pixels, used on skies it will bring out detail that was not seen before, to finish the edit I used a small amount of Dodge and Burn to further enhance the dynamics of the image, the finished picture should look like this.


I hope this short tutorial has been of help to you, the same techniques can be used with one raw image just by altering the exposure in the raw converter and opening into PS as many times as needed, this image I have used as an example is of extreme EV [exposure values] and without using two images would have been out of the cameras EV range to capture the tonal ranges needed for this shot and could only be produced and processed in the way described.
------------------------------------------------------------

Dodge and Burn Techniques

For many years wet darkroom workers used the dodge and burn method to lighten and darken images in selected areas of the image, because they where working with light that was from the enlarger and no image to actually see it was a very skilled operation using pre-cut shapes of card plus manipulation of the hands to D&B and took years to perfect, with digital that skill has gone and is much easier to achieve but there is still a skill in getting the desired effect just right, in this tutorial i will show how I Dodge and Burn and why its necessary in digital imaging

Firstly i consider any form of subtraction or addition of light to an image as D&B, there are many ways to achieve the same effect in Photoshop, explained below are three popular ways to do this.

D&B using Selective colour

You will find this dialogue box in PS under image~adjustments~selective colour.


Although all colours can be used, the ones that are best for D&B editing in selective colour are Neutrals and Whites, example one is straight from Raw with no adjustment, all work is carried out on a copied layer ["cntrl J"] shortcut.


In example two I have selected Neutrals from the drop down and will move the black slider to the left to open the darker regions.


Now I will add a layer mask by pressing Alt and clicking the add layer mask icon at the bottom of the layers palette, the effect will be hidden under the mask, all that's needed to do is select a soft brush, foreground colour in the tools palette is set to white and paint the effect back where needed, also by adjusting the brush opacity you can control the amount of painting back anywhere on the image.


Now I will use the above method but this time move the black slider to the right to darken the sky.


As you can see in example four that we have opened the shadows and darkened the sky with smooth transition where applied, the image my look flat as no other editing as been done to boost contrast, this is dealt with in "Contrast increasing using USM"

D&B using Levels command

Levels dialoque box can be found in PS under image~adjustments.


The difference with using Levels as against Selective colour is you have the advantage of using the Histogram, this will allow you to avoid clipping the highlights and shadows, the stack in the histogram box should touch both far left and far right points to avoid clipping, by adjusting the middle Gamma slider, you can slide left to lighten and right to darken, then use the mask and brush to selectively D&B.

[B]D&B using 50% grey and bush tools[/B]

First we must go to the layers palette and open the drop down and click on new layer.


Now in the mode drop on the new layer, select overlay, then click the box as in the example below.


Now select a soft brush, harder if you need to be more precise and set your foreground colour to white to Dodge and black to Burn, also lower the brush opacity to around 20% and paint away where needed, in example below no D&B applied.


In the example below I have lightened the grass and darkened the sky, a great deal of control can be had using this method, vary your opacity but don't go to high, this is one of my favourite methods of D&B works a treat.


Dodge and Burn tools in the tools palette

These tools work in a different way to the above methods, I use these normally at the end of an edit to increase the tonal range and contrast, if heavy D&B is required I would prefer to use the above methods.


The Range when using the Dodge tool must be set to Highlights and Range set to Shadows for the Burn tool, always keep your Exposure setting no higher that 13% and vary this when using the tools to give a visual increase in tonal range, the tools are different because when set to Dodge, the Light pixels are effected and set to Dark, shadow pixels are affected

Here's an example of a partially edited image without D&B used.


And here's the image where I have selectively burnt and dodged the image, notice how the tonal range has increased.


Here's the finished image carefully edited with 50% overlay, D&b tools used plus the other techniques in my other tutorials and a slight tone applied.


So to summaries, four different ways to D&B, two very similar, Selective colour and Levels. 50% Overlay and D&B tools.
Which would I use the most, first for heavy D&B the 50% Overlay, for fine tuning, increasing contrast the D&B tools, the others Selective colour and Levels are very powerful tools in there own right but not a user friendly as the other two.
------------------------------------------------------------

Friday, March 7, 2008

clipped from www.dirkpaessler.com


Tutorial: Create Your Own Planets

To make a long story short: The "Polar Panorama Effect" is one of my favourite ways to process photos into unique pieces of art. It takes a panoramic (or at least a landscape-ish) photo and uses the Polar Coordinates filter of Photoshop or The Gimp to create a circular image that seems to wrap the panorama around a planet.

Here are two samples for you to get an idea:

Planet "San Michele, Venice":
Planet San Michele

Planet "Manhattan NYC":
Planet Manhattan (Generation II)

In this article I will share my experiences with this technique, scribble together some things I found out and I will add a couple of links to help you get more out of it.

Selecting a Panorama or Photo for Your Planet

When selecting a photo to start with you should keep the following things in mind:

  • Select a panorama photo or a cropped landscape photo (aspect ratio at least 2:1, which means the width should be at least two times the height).
  • The bottom area (bottom 25% or so) of the photo in most cases should have only very little detail (e.g. sand, asphalt, water). This area will later be in the middle of the picture and will also be distorted the most.
  • The upper area (upper 25%) should also have only little detail, most preferably just one color (e.g. blue sky, night sky etc.).
  • The left and the right border of the photo should neatly fit into each other (which is always the case for a stitched 360° panorama).
  • The horizon must be exactly horizontal, the left and right end of the photo will be joined together and if they are on different heights your planet will have a big crack in the surface (again this is no issue for 360° panoramas).

Simple Sample: Planet "San Francisco"

We have the easiest start when we start with a 360° panorama, so let's take my Panorama shot of San Francisco taken from the Coit Tower:

San Francisco from Coit Tower

Step 1: Convert the photo into a square image

Use the Photo|Image Size menu item to change the image size into a large square. Uncheck 'Constrain Proporties' and set the "height" value to the same value as your "width" value. You will get a square image:

Tutorial Simple Step 2.jpg

Step 2: Rotate by 180° and apply the polar effect

Now rotate the photo by 180 degrees…

Tutorial Simple Step 3.jpg

… and apply the "Filter|Distort|Polar Coordinates" filter (choose the "Rectangular to Polar" setting). If you are a user of The Gimp the command is "Filters->Distorts->Polar Coords".

Tutorial Simple Step 4.jpg

Well, as you can see that was already most of the magic:

Tutorial Simple Step 5.jpg

Step 3: Rotate and clean up

The rest is just a little digital darkroom work: Rotate the planet to your liking, filter contrast and colors, clean up the sky and the edges where left and right border of the image came together.

Tutorial Simple Step 6.jpg

Advanced Sample: Planet "Venice"

Most of my planets were created using panoramas, but for this second sample we will use the following photo from Venice which shows San Girgio Maggiore Island. Islands are especially good suited for planets because on the left and right edge you only have the horizon to stitch together. This photo fits all the aspects mentioned above.

Step A 1.jpg

Step 0: Cropping and Straightening

First we have to crop the image as needed and straighten it to make the horizon absolutely horizontal. Using the cropping tool of PhotoShop we can do both processes in one step:

First we must make sure that our crop window is parallel to the horizon. This image shows how you can do this:

Step 1.jpg

Choose the crop tool of PhotoShop and select a flat rectangular area of the photo. Move the cursor just outside of an edge of the marked area where the cursor changes into two arrows pointing left and up. Click the mouse button and you can rotate the cropped area.

By moving the top border to the horizon of the photo you can exactly inspect the rotation. Move and rotate the crop window until the top border and your horizon is parallel, but don't activate the crop yet. Good. Now we have a selection that is horizontal.

Now we want to make sure the left and the right border of the image fit together. Using the same trick we now look for areas on the right and the left where the buildings have the same height:

step2.jpg

Move the right and left borders as desired. Then finally move the top and bottom border in order to have the waterline roughly in the middle of the cropped photo:

step3.jpg

Double click the image and you are ready for the transformation!

step 4.jpg

Step 1: Convert the photo into a square image

From here everything works like in the simple sample: Use the Photo|Image Size menu item to change the image size into a large square. Uncheck 'Constrain Proporties' and set the "height" value to the same value as your "width" value.

step 5.jpg

Step 2: Rotate by 180° and apply the polar effect

Now rotate the photo by 180 degrees and apply the "Filter|Distort|Polar Coordinates" filter (choose the "Rectangular to Polar" setting). If you are a user of The Gimp the command is "Filters->Distorts->Polar Coords".

step 6.jpg

Step 3: Rotate and clean up

Again, the rest is just a little digital darkroom work. Here are the things I did with this image:

  • Use the copy-brush to hide the stitch borders
  • Rotate the photo to my liking
  • The usual photo editing of histograms curves, contrast and color

The final result could then look like this:

Planet

Want more samples?!

Source Panorama Polar Panorama
Planet Venice - San Michele
A Boat in the sun? Sunrise on Montauk Beach, Long Island
Planet Manhattan and Statue of Liberty
Planet Manhattan Night Panorama
Our living room... (Polar Panorama) Our living room... (360° Panorama)

More on my Make Your Own Planets photo set on flickr.

What's next?

Want to do more with this technique? Here are some suggestions:

  • Upload your images to flickr and add them to the "Create your own planets" group
  • For some panoramas leaving away the 180° rotation creates nice images like this images shows:
    Waiting for the concert
    The source panorama (360°) can be seen here
  • Flickr user "Seb Przd" has experimented with other projections for his panoramas, this could be an interesting way to go on

    Software I use

    To create my panoramas I usually take the photos without a tripod and use AutoStitch (freeware) and PanoramaFactory (shareware $30) for the digital work.

    The Flexify filter module ($35) for Adobe PhotoShop creates polar panoramas on-the-fly and offers numerous projections for your photos.

    About the author

    Dirk Paessler is 37 and is hooked on photography since 20 years. Have a look at his photoblog. When he is not taking photos he works as the CEO of Paessler, a software company creating network monitoring software.

How much of this blog did you find useful? Be honest!