Sunday, June 1, 2008

Whiten teeth and eyes in Photoshop

There are quite a few tutorials available on this topic via Google search. Most of them involved destructive editing, i.e., to undo editing you had to use Edit>Undo or History.
This method uses layer mask so if you want to go back a couple of steps, you just have to change foreground colour by hitting X and painting over the edited area.

Comments and suggestions are welcome.
Sumit

Thursday, May 29, 2008

Smoke Art

Read this doc on Scribd: Smoke Art

Friday, May 23, 2008

Time Lapse Photography

clipped from photojojo.com

Time Lapse 101: An Overview


Alright, so it's not time-travel. All time-lapse photography is, really, is shooting a bunch of photos of the same thing, spread out over a period of time, and smushing them together into one video that plays back in a shorter amount of time. In the words of our pal Genie, "Phenomenal cosmic powers… Itty-bitty living space!" Yeah, time-lapse is kinda like that.


Time-lapse lets you see the natural progression of time, while not having to wait through the actual length of it… so you could watch the sunset (at least, yesterday's sunset) as you always wanted to, without staying up late to do so – and you could fit it all within a nice, brief commercial break in-between episodes of "Dr. Who" too.


Now, there's a few basic steps to take in creating a time-lapse film:


  1. Choose your subject.

  2. Figure everything out.

  3. Shoot your still photographs.

  4. Edit your photos in Photoshop (Optional).

  5. Assemble all your photos together into a video.

  6. Edit your video – add titles, music, and all that jazz.


Step #1: Choose Your Subject

We know that you're a very clever sod and probably have some brilliant ideas already in mind for what to shoot in time-lapse form. But just in case, here are a few suggestions to get you thinking:


  • Fruit rotting/ice melting
  • Grass growing
  • A cross-country drive from LA to NY in 5 days
  • Sunrises or sunsets
  • A busy city street over a day's time
  • Opening of flower buds (basically any form of nature)
  • A baby growing in mommy's tummy (throughout the whole pregnancy)
  • A construction site
  • The desert sky (stars!), or other natural landscapes
  • A self-portrait as you age over a number of years
  • Life cycle of a tree over a year's period
  • Snail races
  • Cookies baking in the oven

Ask yourself how much time you have to commit – the four hours it takes for a snail to get across the back porch might be a lot more do-able than the four months it takes a construction site to be finished.


Step #2: Figuring Out Intervals and Everything Else

Based on what you're shooting, you'll want to know how long your actual event or subject will last (or at least, how long you're willing to shoot for), whether you want your final movie to be blocky or smooth, how long you want your final movie to be, and based on all of that, how often (at what interval) you'll want to take photos of the event.


The Length of the Event
Usually the length of the project changes how you're going to shoot it. For longer-term projects, like this nifty time-lapse that documented a soon-to-be-mom's growing tummy throughout the nine months of her pregnancy, you might only need to get a new shot every day or so – you could do that with a point-and-shoot, and not need any fancy automated equipment.


Ask yourself how long you can go between photos while still documenting the action of the event; for change that is pretty big and radical over a shorter amount of time, you'll want to shoot it more often. For change that is gradual and slow over a longer time, you can have more lengthy intervals between shots.


How the Final Movie Appears
Your final movie can end up two ways: blocky or smooth and seamless. With blocky, shots will seem to abruptly change into the next – in a crowded street scene, for example, a person might appear in one part of the screen and then, blip!, suddenly be halfway across the screen in the next frame.


The alternative is blending the interval shots together, so that it appears smooth and seamless. Usually you do this two ways: drag your shutter speed when you're shooting, and shoot your subject more often (at shorter intervals).


Which is better? It's up to you! For events or time-lapse subjects where the change is gradual and slow (like a construction site), blocky might be fine. Where change occurs much faster (like a blossoming plant), smooth and seamless would probably be better.


The Magic Formula
Most movies show around 20-30 frames per second; the more frames per second, generally the smoother the movie will play back (though of course, this depends on other things too). If we're going to make E.T.'s flower come back to life, we'll want it to be shown at around 24 fps and be smooth and seamless.


We also need to ask how long we want the final movie to be. We're thinking E.T.'s flower coming back to life to should last around 30 seconds… so, some quick math to find out how many frames we need to capture:


24 fps times 30 seconds = 720 frames

Awesome. Now to find out how often (at what interval) we need to shoot frames of a flower decaying (we'll play the final movie in reverse to make it look like it's coming back alive). First we estimate how long the actual event lasts – about 4 hours (or 14,400 seconds), we think. Some more quick math:


14,400 seconds (length of actual event) divided by 720 frames (frames needed for final movie) = 20-second intervals between shots/frames

So we have our plan, Stan! When you start your time-lapse project, we'd really recommend thinking ahead like this.


STEP #3: Shooting your Still Photographs

It really doesn't matter what you shoot your time-lapse photos with, as long as you shoot them – we've seen people use SLRs, point-and-shoot cameras, and webcams.


Whatever you use, we recommend you mount your camera on a tripod (unless you have Super-Man endurance and don't mind standing there holding it for eight hours or however long). If you don't have a tripod, wedge your camera between a couple books, or make a custom base for it.


Shooting with an SLR: Intervalometers
intervalometer.jpgIf you have an SLR, we've got one bit of advice for you: get yourself an intervalometer. They're often called timer remote controllers, and they run about $60 – here's a good Canon one, and here's a Nikon one.


With an intervalometer (or timer remote controller), you can program your camera to shoot at certain times and at certain intervals – such as 1 frame every 5 seconds, 1 frame every minute, and so on. This leaves you free to go do something else, when you're ready.


Now set up the rest of your camera:


  • Set your camera to record JPG, to save on space. (Each photo is only on screen a small time anyway.)

  • Set your camera's white balance to manual – auto-white balance can change and fluctuate, especially if you'll be shooting something for a while and the light gets brighter or dimmer over time. Setting it to manual helps ensure all your photos keep reasonably the same look.

  • Set your camera's exposure manually – for most of the same reasons, you'll want to take your camera's exposure off automatic as well.


The idea is that your camera's settings should change as little as possible while it's doing its thing.


Now, remember back when you decided between Blocky or Smooth? If you're after the smooth and seamless look in your final movie, you'll want to adjust your exposure (how long the shutter stays open to capture light while taking a photo) to be as long as possible. When you force your shutter to stay open a longer time (often called "dragging your shutter"), moving objects, like cars and people, will then appear more as a blur, and will "smear" across your scene. Your final move will have much smoother action this way.


The side-effect of long exposures is a lot more light coming at your camera – often too much light. If you're going to drag your shutter, we'd suggest getting a neutral density filter to help wrangle the extra light under control.


If you're going the SLR route, we'd also suggest taking a look at Zach Wise's awesome video tutorial on shooting time-lapse with an SLR. It's a great primer to begin with.


Shooting with a Point-and-Shoot: Time-Settings
pclix_tripod.jpgSome point-and-shoot cameras have an interval setting buried deep in their menu somewhere, but most don't – which means that, unless you want to sit there holding your camera however long and manually take the pictures, point-and-shoot cameras might not be your best bet.


For some time-lapse ideas, that might work just fine – especially time-lapse videos where you only need one or two shots a day. A time-lapse of a baby growing in mom's tummy over the course of nine months, for example, would be great to shoot manually with a point-and-shoot.


There are also some extra add-on timer devices, like the Pclix, that will cause your camera to trigger at specified intervals – but they don't work with all point-and-shooters, so the chances might be slim of getting one that works for you. You could also hack your camera and wire it up to a home-made intervalometer… but, uh, do that at your own risk. And probably not with a brand-new camera.


Shooting with a Web-Cam: Time-lapse Software
gawker1.jpgAmazingly, using a web-camera with your computer might just be the easiest route to take – thanks to some very nifty software.


For Mac, there's the unbelievably cool freeware program Gawker. It immediately recognizes any iSight or web-cam hooked up to your computer – or even better, on any computer on your network – and after specifying an interval for it to take new shots at, gives you one-button time-lapse recording from that iSight. Even better, you can also combine views from multiple iSights or web-cams into a single, split-screen time-lapse video – or you could even use your computer desktop and what you're doing on it as a source for your time-lapse.


For PCs, Webcam Timershot – part of Microsoft's PowerToys package of free add-on software – does much the same as Gawker (minus the split-screen ability and having the option to record your desktop): specify an interval, and Webcam Timershot will take pictures from your web-cam and save them to a location you choose.


Last Minute Checklist
Ready too go? Good. But wait, a few last minute things:


  • Make sure the batteries are all charged up with enough juice.
  • Does your memory card have enough room? (If not, select a lower jpg setting – or run out and buy a new card!)
  • Try not to walk off, leaving your camera abandoned. Many a noble camera lost its life to thievery while on a time-lapse mission.

Step #4: Edit your Photos


photoshop-batchaction_thumb.jpgWhew. After all of that, can you believe you've finally reached the easy steps? All that's left is to download the photos to your computer, edit them if you want, and, with some software, assemble them into a movie.


It isn't necessary every time, but sometimes you'll have a batch of photos that need just a little tweaking before anything else. Maybe the exposure or levels could use some nudging, or you want to adjust the saturation a bit. Great. One quick tip: Automate Everything.


In Photoshop, practice on one photo from the bunch, adjusting it to how you like it – then create an Action in Photoshop to do exactly what you just did. Close your photo without saving, then use Photoshop's Automate Batch command. Select the folder of all your photos – your source – and create a new folder for where the edited photos are gonna go – the destination. Then select your newly created Action, and Ok – off they go.


You'll end up with your batch of photos, all edited, in your new folder… lookin' good and primed to be put together!


Step #5: Start Making Your Movie


Use Quicktime Pro to Assemble Your Photos Into a Movie
quicktime-openimagesequence_thumb.jpgAfter you've downloaded your photos to your computer and saved them in a folder somewhere, we've found the quickest and easiest way to assemble them into a final time-lapse video is to use Apple's QuickTime Pro (available for $30 at Apple.com for Mac or Windows).


Underneath the File window of Quicktime, select "Open Image Sequence", then navigate to the folder with your photos and select the first one. Hit okay, and then QuickTime will ask you how many frames-per-second you want your movie to have. QuickTime will do all the rest for you.


From here, you can export it for the web or save it so that you can add titles, music, and other effects to it in a movie editing program.


Or: Assemble Your Movie with iMovie or Another Application
imoviephotosettings.jpgWe found Quicktime Pro to be the best and easiest for this, but you can also accomplish pretty much the same thing in other video editing programs. To use iMovie, for instance, import all your photos into iPhoto. Once you have a new project started in iMovie, find your photos in the Media window, select them all (either by clicking and dragging your mouse or selecting the first photo and holding shift as you then select the last one too – all the ones in between should also be selected), and then open the Photo Settings for them. Set the duration for each photo to a nice small number, like "0:03″ – this will play each photo for 3 frames, adjust to your liking – and hit Apply to be done!


The photos will be added to your movie's timeline and you'll have the beginnings of a swanky time-lapse video.


(If you're using another application besides iMovie or Quicktime Pro, the process will likely be about the same – either opening an image sequence, or manually adding your photos in order and adjusting their duration.)


Step #6: Add titles, music, and effects


imovie-addingmusic_thumb.jpgAfter you have a time-lapse movie file, import it into iMovie or Final Cut Pro if you're a Mac fan, or Windows Movie Maker or Adobe Premiere if you're running Windows.


Add some music and titles, and you're ready to show off your final movie!


You might also want to try some effects, like panning and zooming over your finished time-lapse movie, to add motion and hone in on what's interesting.


Extra Bonus Things & Resources

  • If you're big on graphs to help you get the bigger picture, Wikipedia's article on time-lapse photography has 'em. It's a great overview and bound to de-mystify some of the more technical aspects of time-lapse.


  • Print a flip book out with your time-lapse! FlipClips.com lets you upload short video clips and, in a quick jif, will have them printed out as flip books and sent off to you. Perfect for any time-lapse project.

  • Piclens - immersive slideshows for Flickr

    This slideshow generator is considered to be the coolest plugin ever, to view your photos on Flickr. I SERIOUSLY recommend that you try it out. It'll change the way you look at photos online forever!

    Here is a video grab of their slideshow of our group photo pool:


    Click here to go to their website for more details.
    To get their free plugin for Internet Explorer, click here.
    To get their free plugin for Firefox, click here.

    Monday, March 10, 2008

    Creating Stunning Monos 3

    Contrast increasing using USM

    The unsharp mask [effectively a high pass filter] is used to sharpen and image, something the name does not suggest, sharpening will help to emphasize texture and detail, it is a crucial part of the editing process especially in monochrome work, this tutorial is based on using Photoshop.

    USM sharpening works by using a slightly blurred version of the original image, this is then removed away from the original to find the presence of edges, using the USM filter increases the contrast giving the look of a sharper image, in this tutorial I will also show how USM used at higher than normal amounts will not only appear sharper with better contrast but will make the image pop so to speak and bring out detail, it is best used selectively using layer masks to give greater control within the images, a word of caution, if over used it will increase the pixalization and give haloing to edges, do experiment with the settings and and when using your brush tool vary the amount of opacity when painting back.

    This example is an untouched image straight from Raw image with no USM applied


    This is the converted image


    Now look at the sky and foreground on this image, it lacks contrast and is flat looking.

    In the Photoshop dialogue box below I have set the Amount to 68, Radius to 50 and threshold 0, but as said previously do experiment, next you need to copy the image by pressing Cntrl J and have two layers present in the layers palette as shown.


    Here's the USM applied at the settings above, you will see the image now looks over sharpened and has accentuated the edge contrast to much resulting in halos especially where dark pixels meet light, plus added pixel clumps are now present in the clear sky region.


    The next part is to apply a layer mask by pressing Alt on your keyboard, keeping it depressed and clicking the add layer mask icon in the layers palette, this masks the USM effect out, we need now to paint back the effect using a soft brush with the foreground colour set to white in the tools palette, remembering to avoid painting where light to dark areas meet, on the white clouds I have used brush opacity at 100% and not applied it to the blue area of the sky or the middle foreground trees and houses, if USM was painted to those areas it would start to "block" the shadows up and give a blotchy appearance in the plain sky, if any white areas start to bleach out just change your foreground colour to black and carefully paint the USM out, or you could lower the brush opacity by 50% in those particular areas.

    Here's the image with USM selectively applied as described above


    The next part will be to open the shadow regions using levels, move the middle slider to the left to open the shadows, then add a layer mask to hide the effect and painting back the lighter areas where required, flatten the image, open levels again, darken the blue sky area by moving the middle slider in Levels to the right, add a layer mask and paint back the darker area.


    The final stage is to apply USM to all the image at a low amount but same radius IE : amount 14% radius 50% threshold still at zero, plus adding a touch of Dodge and burn to further enhance the contrast.

    Here's the finished result, as you can see only three types of edit used, [I]USM, Levels plus Dodge and Burn,[/I] the image now has four important elements to achieving a good black and white image, contrast, clean whites, deep blacks and texture.

    Finished image

    Creating Stunning Monos 2

    Sky Editing plus Channel Mixer settings to imitate film responce

    Sky Editing

    For me huge and important part of landscape photography, how many times do we see a great picture with nice land features but no control in the sky areas, bland, blown highlights and featureless, well there's ways around this and in this short tutorial I will show you how to achieve dramatic skies that will improve the look and impact of most landscapes.

    Importantly the exposure must be right when the shot is taken as blown highlights are virtually impossible to retrieve, so control at taking stage is of paramount importance, the colour image below was taken in Raw and I used a grey graduate filter to reduce the contrast.

    The first image below is unedited in the Photoshop raw converter, as you can see the exposure has given a nice tonal range but there is a slight over exposure between the trees and the white balance needs correction.


    In the example below I have made corrections to get the colour right as this is important in BW as much as in colour work, because in conversion we will be working with colour channels to get the desired effect,I have also made adjustments to the auto settings by reducing all the settings slightly to give a more saturated image, but made no adjustment to the saturation slider. The importance of working with Raw files can be seen as adjustments like this are easy to carry out.


    Next the image can now be opened into PS for conversion, I used the Channel mixer to convert, settings as example below, I have used 100% Red for a more dramatic look.


    This is the converted image with no editing to the sky apart from conversion, you might think this looks OK but theres more work to apply to it to bring out detail and contrast.


    First copy the image then go filter~unsharpe mask, set Amount to 54 Radius to 50 and Threshold to 0, now the contrast has increased but their are problems between the trees with blown highlights and haloing to the edges.


    Image with USM applied


    On example three I have applied a layer mask by pressing Alt and the add layer mask icon in the layers palette, this will hide the USM effect, in the tools palette select a soft brush and make your foreground colour white, what needs to be done now is to paint the USM effect back avoiding the areas where the highlights have blown and the edge haloing has occurred.


    You can see that in example three that the highlights have returned and no edge haloing has occurred.

    To put a final finish to the image is subjective but I will darken the sky a touch by adjusting the middle gamma slider in Levels, add 20% more USM at the same settings set previously using the add layer mask and painting the effect back but avoiding the areas mentioned above, and then use the Dodge and Burn tools to selectively lighten and darken parts of the sky, when using the D&B tools the Dodge tool should always have the "range" set to highlights and when using the Burn tool the Range set to shadows,vary the brush opacity and its best not to go above 13% exposure for both, always work on a copied layer then fine adjustments can be carried out with the opacity slider in the layers palette, below is the finished image.


    ------------------------------------------------------------
    Suggested Channel mixer settings

    Here's a selection of settings to apply in Channel mixer to give colour response using different B&W films

    Please note for newcomers using Channel Mixer the Ist number =Red channel 2nd number = Green channel 3rd number = Blue channel

    Here's a selection of C/M settings to imitate film

    Agfa 200X: 18,41,41
    Agfapan 25: 25,39,36
    Agfapan 100: 21,40,39
    Agfapan 400: 20,41,39

    Ilford Delta 100: 21,42,37
    Ilford Delta 400: 22,42,36
    Ilford Delta 400 Pro: 31,36,33
    & 3200

    Ilford FP4: 28,41,31
    Ilford HP5: 23,37,40
    Ilford Pan F: 33,36,31
    Ilford SFX: 36,31,33
    Ilford XP2 Super: 21,42,37

    Kodak Tmax 100: 24,37,39
    Kodak Tmax 400: 27,36,37
    Kodak Tri-X: 25,35,40

    And these basic ones:

    Normal Contrast: 43,33,30
    High Contrast: 40,34,60

    Creating Stunning Monos 1

    Multi Raw editing plus Dodge and Burn technique

    Multi Raw Editing
    Under normal non extreme lighting conditions the modern camera of today will give a well balanced exposure for highlight and shadows, in some circumstances fill flash will also improve things further, but where flash is not practical editing techniques in your photo editing software will enable you to fine tune the exposure short falls in the highlight and shadow regions to produce a well balanced image. But there are times when in say landscape photography to produce a dramatic shot of the lighting manifesting itself in front of you, the only way to capture this is to shoot into the light this in turn presents a problem for your camera as to what exposure it will set in either manual or auto, what will happen is that it will generally be fooled by the brightness of the sky area and underexpose the image leaving the foreground with no detail at all or so little data that even adjusting the exposure slider in the Raw converter will not bring out the shadow detail needed, so a method of capturing both highlight and shadow detail is need to provide the right kinds of exposure to produce workable data in these areas, below is a detailed explanation of how to achieve this using two Raw images of the same subject but at different exposure levels, then using these to produce an image with both areas giving acceptable highlight and shadow detail. The images I have chosen as an example are ones of very high contrast in the sky area and a dark foreground, one that would be impossible to produce using one exposure.

    Exposure

    First it must be said that lens of high quality are better used for a shot like this as they will control flare to a minimum, set your camera on tripod or brace it so there is no camera movement, set your auto bracket to give, 1st/ auto exposure, 2nd/ minus 2 stops and the 3rd in the sequence plus 2 stops EV, once you have the images then the next step is on your computer.

    My Multi Raw file editing technique
    The images below is part of the AB sequence
    Ist shot no compensation


    2nd shot minus 2 stops EV


    3rd shot plus two stops EV


    From the 3 bracketed exposures I have choose images 2 and 3 for my edit, image 2 kept highlights in tact and image 3 with foreground shadow detail present, I did not choose image 1 as highlight detail in the central part had blown, "over exposed"

    First for those not that familiar with Photoshop here is a guide to the main tools needed.


    Masking and Levels

    The first part of the process is to open the chosen images into the Raw converter in this example image 2 is the first, once opened fine adjust the colour balance~shadow areas etc then open the image into PS, now open image three adjust in the raw converter as necessary and open this image into PS, with image three as the active window go to select~select all, edit~copy, deselect and close the image, we now have one active image, go to edit~paste, the copied image is now pasted onto the active image you will notice we now have a copied layer in the layers palette, the next part is to add a layer mask, press Alt on your keyboard and keeping it depressed click the add layer mask icon in the layers palette the image is now masked and only the sky showing, now select a brush from the tools palette [soft brush] and with the foreground colour set to white paint the entire mask out to reveal all the image underneath the mask, now comes the tricky~skilled bit :-) something that requires practice and an idea of what you want the finished "mood" of the image to look like, change your foreground colour to black reduce the brush opacity to 50% and paint back the sky region taking care around the grassy horizon area [we don't want the edit to show here] use the brush as an artist would by varying the opacity to create a balanced overall look and not over processed, if you need to lighten an area just change your foreground colour to white and vica versa to darken, once happy with the edit flatten the image, when done the image should look like this.


    Now one thing needs to be done before conversion to monochrome and that is to open the shadow regions and lighten the land area this is done by using levels, press Cntrl J to copy the layer, go to edit~adjustments~levels and pull the middle slider to the left to lighten the land area, all the image will be affected but we are only concerned about the land region, now as described above pres Alt~add layer mask, the levels edit is hidden by the mask, using the brush technique paint back the lighter areas to open the shadows the image should look like this now. Flatten the image.


    Conversion to Monochrome

    There are many ways to convert a colour image in Photoshop, my favoured method within PS is Channel mixer but i tend now to use a PS plug in called the imagingfactory I find this to be multi functional and more in keeping with conventional BW editing in the wet darkroom era but it does come at a cost, if you only convert the odd image I would use C/M but for the Mono enthusiast theimagingfactory is very good in this example I have used C/M as i think most newcomers to BW will use it, first press Cntrl J then go to image~ adjustments ~Channel mixer make sure the mono box is checked, now set Red to 100% Green to 0 Blue to 0 reduce the constant slider by approx -6 to darken the sky press ok, Alt add layer mask the image is now all colour use the brush tool to paint back the sky area only so your left with a mono sky and colour land and flatten the image, bring up C/M again but this time set Red to 0 Green to 100% Blue to 0, don't be afraid to use more than 100% green in fact I pulled this to 130%, press ok and flatten, the image should look like this.


    Now we need to in increase the contrast I like to use the USM filter for this at high settings, some have said that to high and it is a destructive process but if used with care and selectively applied using the masking technique there is no better way of making the image pop, I regularly print out large images on Fine art paper that look great with no signs its been used other than the deep blacks, crisp whites and the contrast that's needed for most BW images, so Cntrl J filter~unsharp mask set it to this below.


    Once you have applied it care must be taken on the pixel edges especially light against dark areas as haloing will occur but there is a way around this, yes the "add layer mask technique" we have been using previously, just press Alt add layer mask and paint back the USM "avoiding" the light to dark pixel edges that way no halo will occur, also use the brush at varying opacities, if full 100% brush opacity is used in the darker regions blocked out shadows will result [completely black areas that look bad especially when printed out] sometimes i use two passes with the filter for even more effect, this is a tricky edit to get used to but once perfected you will use it more and more on your edits it does need handling with care as over cooking it will result in a breakdown of the pixels, used on skies it will bring out detail that was not seen before, to finish the edit I used a small amount of Dodge and Burn to further enhance the dynamics of the image, the finished picture should look like this.


    I hope this short tutorial has been of help to you, the same techniques can be used with one raw image just by altering the exposure in the raw converter and opening into PS as many times as needed, this image I have used as an example is of extreme EV [exposure values] and without using two images would have been out of the cameras EV range to capture the tonal ranges needed for this shot and could only be produced and processed in the way described.
    ------------------------------------------------------------

    Dodge and Burn Techniques

    For many years wet darkroom workers used the dodge and burn method to lighten and darken images in selected areas of the image, because they where working with light that was from the enlarger and no image to actually see it was a very skilled operation using pre-cut shapes of card plus manipulation of the hands to D&B and took years to perfect, with digital that skill has gone and is much easier to achieve but there is still a skill in getting the desired effect just right, in this tutorial i will show how I Dodge and Burn and why its necessary in digital imaging

    Firstly i consider any form of subtraction or addition of light to an image as D&B, there are many ways to achieve the same effect in Photoshop, explained below are three popular ways to do this.

    D&B using Selective colour

    You will find this dialogue box in PS under image~adjustments~selective colour.


    Although all colours can be used, the ones that are best for D&B editing in selective colour are Neutrals and Whites, example one is straight from Raw with no adjustment, all work is carried out on a copied layer ["cntrl J"] shortcut.


    In example two I have selected Neutrals from the drop down and will move the black slider to the left to open the darker regions.


    Now I will add a layer mask by pressing Alt and clicking the add layer mask icon at the bottom of the layers palette, the effect will be hidden under the mask, all that's needed to do is select a soft brush, foreground colour in the tools palette is set to white and paint the effect back where needed, also by adjusting the brush opacity you can control the amount of painting back anywhere on the image.


    Now I will use the above method but this time move the black slider to the right to darken the sky.


    As you can see in example four that we have opened the shadows and darkened the sky with smooth transition where applied, the image my look flat as no other editing as been done to boost contrast, this is dealt with in "Contrast increasing using USM"

    D&B using Levels command

    Levels dialoque box can be found in PS under image~adjustments.


    The difference with using Levels as against Selective colour is you have the advantage of using the Histogram, this will allow you to avoid clipping the highlights and shadows, the stack in the histogram box should touch both far left and far right points to avoid clipping, by adjusting the middle Gamma slider, you can slide left to lighten and right to darken, then use the mask and brush to selectively D&B.

    [B]D&B using 50% grey and bush tools[/B]

    First we must go to the layers palette and open the drop down and click on new layer.


    Now in the mode drop on the new layer, select overlay, then click the box as in the example below.


    Now select a soft brush, harder if you need to be more precise and set your foreground colour to white to Dodge and black to Burn, also lower the brush opacity to around 20% and paint away where needed, in example below no D&B applied.


    In the example below I have lightened the grass and darkened the sky, a great deal of control can be had using this method, vary your opacity but don't go to high, this is one of my favourite methods of D&B works a treat.


    Dodge and Burn tools in the tools palette

    These tools work in a different way to the above methods, I use these normally at the end of an edit to increase the tonal range and contrast, if heavy D&B is required I would prefer to use the above methods.


    The Range when using the Dodge tool must be set to Highlights and Range set to Shadows for the Burn tool, always keep your Exposure setting no higher that 13% and vary this when using the tools to give a visual increase in tonal range, the tools are different because when set to Dodge, the Light pixels are effected and set to Dark, shadow pixels are affected

    Here's an example of a partially edited image without D&B used.


    And here's the image where I have selectively burnt and dodged the image, notice how the tonal range has increased.


    Here's the finished image carefully edited with 50% overlay, D&b tools used plus the other techniques in my other tutorials and a slight tone applied.


    So to summaries, four different ways to D&B, two very similar, Selective colour and Levels. 50% Overlay and D&B tools.
    Which would I use the most, first for heavy D&B the 50% Overlay, for fine tuning, increasing contrast the D&B tools, the others Selective colour and Levels are very powerful tools in there own right but not a user friendly as the other two.
    ------------------------------------------------------------

    Friday, March 7, 2008

    clipped from www.dirkpaessler.com


    Tutorial: Create Your Own Planets

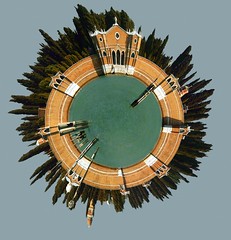
    To make a long story short: The "Polar Panorama Effect" is one of my favourite ways to process photos into unique pieces of art. It takes a panoramic (or at least a landscape-ish) photo and uses the Polar Coordinates filter of Photoshop or The Gimp to create a circular image that seems to wrap the panorama around a planet.

    Here are two samples for you to get an idea:

    Planet "San Michele, Venice":
    Planet San Michele

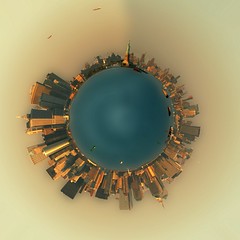
    Planet "Manhattan NYC":
    Planet Manhattan (Generation II)

    In this article I will share my experiences with this technique, scribble together some things I found out and I will add a couple of links to help you get more out of it.

    Selecting a Panorama or Photo for Your Planet

    When selecting a photo to start with you should keep the following things in mind:

    • Select a panorama photo or a cropped landscape photo (aspect ratio at least 2:1, which means the width should be at least two times the height).
    • The bottom area (bottom 25% or so) of the photo in most cases should have only very little detail (e.g. sand, asphalt, water). This area will later be in the middle of the picture and will also be distorted the most.
    • The upper area (upper 25%) should also have only little detail, most preferably just one color (e.g. blue sky, night sky etc.).
    • The left and the right border of the photo should neatly fit into each other (which is always the case for a stitched 360° panorama).
    • The horizon must be exactly horizontal, the left and right end of the photo will be joined together and if they are on different heights your planet will have a big crack in the surface (again this is no issue for 360° panoramas).

    Simple Sample: Planet "San Francisco"

    We have the easiest start when we start with a 360° panorama, so let's take my Panorama shot of San Francisco taken from the Coit Tower:

    San Francisco from Coit Tower

    Step 1: Convert the photo into a square image

    Use the Photo|Image Size menu item to change the image size into a large square. Uncheck 'Constrain Proporties' and set the "height" value to the same value as your "width" value. You will get a square image:

    Tutorial Simple Step 2.jpg

    Step 2: Rotate by 180° and apply the polar effect

    Now rotate the photo by 180 degrees…

    Tutorial Simple Step 3.jpg

    … and apply the "Filter|Distort|Polar Coordinates" filter (choose the "Rectangular to Polar" setting). If you are a user of The Gimp the command is "Filters->Distorts->Polar Coords".

    Tutorial Simple Step 4.jpg

    Well, as you can see that was already most of the magic:

    Tutorial Simple Step 5.jpg

    Step 3: Rotate and clean up

    The rest is just a little digital darkroom work: Rotate the planet to your liking, filter contrast and colors, clean up the sky and the edges where left and right border of the image came together.

    Tutorial Simple Step 6.jpg

    Advanced Sample: Planet "Venice"

    Most of my planets were created using panoramas, but for this second sample we will use the following photo from Venice which shows San Girgio Maggiore Island. Islands are especially good suited for planets because on the left and right edge you only have the horizon to stitch together. This photo fits all the aspects mentioned above.

    Step A 1.jpg

    Step 0: Cropping and Straightening

    First we have to crop the image as needed and straighten it to make the horizon absolutely horizontal. Using the cropping tool of PhotoShop we can do both processes in one step:

    First we must make sure that our crop window is parallel to the horizon. This image shows how you can do this:

    Step 1.jpg

    Choose the crop tool of PhotoShop and select a flat rectangular area of the photo. Move the cursor just outside of an edge of the marked area where the cursor changes into two arrows pointing left and up. Click the mouse button and you can rotate the cropped area.

    By moving the top border to the horizon of the photo you can exactly inspect the rotation. Move and rotate the crop window until the top border and your horizon is parallel, but don't activate the crop yet. Good. Now we have a selection that is horizontal.

    Now we want to make sure the left and the right border of the image fit together. Using the same trick we now look for areas on the right and the left where the buildings have the same height:

    step2.jpg

    Move the right and left borders as desired. Then finally move the top and bottom border in order to have the waterline roughly in the middle of the cropped photo:

    step3.jpg

    Double click the image and you are ready for the transformation!

    step 4.jpg

    Step 1: Convert the photo into a square image

    From here everything works like in the simple sample: Use the Photo|Image Size menu item to change the image size into a large square. Uncheck 'Constrain Proporties' and set the "height" value to the same value as your "width" value.

    step 5.jpg

    Step 2: Rotate by 180° and apply the polar effect

    Now rotate the photo by 180 degrees and apply the "Filter|Distort|Polar Coordinates" filter (choose the "Rectangular to Polar" setting). If you are a user of The Gimp the command is "Filters->Distorts->Polar Coords".

    step 6.jpg

    Step 3: Rotate and clean up

    Again, the rest is just a little digital darkroom work. Here are the things I did with this image:

    • Use the copy-brush to hide the stitch borders
    • Rotate the photo to my liking
    • The usual photo editing of histograms curves, contrast and color

    The final result could then look like this:

    Planet

    Want more samples?!

    Source Panorama Polar Panorama
    Planet Venice - San Michele
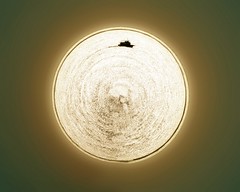
    A Boat in the sun? Sunrise on Montauk Beach, Long Island
    Planet Manhattan and Statue of Liberty
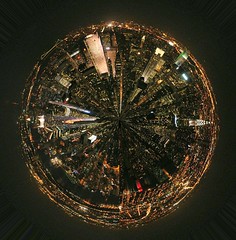
    Planet Manhattan Night Panorama
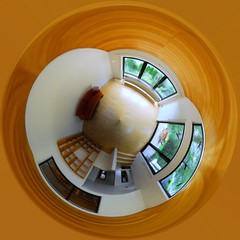
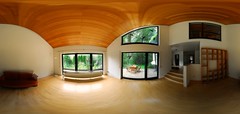
    Our living room... (Polar Panorama) Our living room... (360° Panorama)

    More on my Make Your Own Planets photo set on flickr.

    What's next?

    Want to do more with this technique? Here are some suggestions:
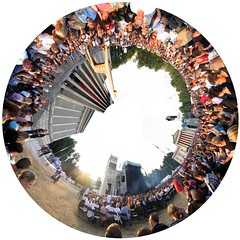
    • Upload your images to flickr and add them to the "Create your own planets" group
    • For some panoramas leaving away the 180° rotation creates nice images like this images shows:
      Waiting for the concert
      The source panorama (360°) can be seen here
    • Flickr user "Seb Przd" has experimented with other projections for his panoramas, this could be an interesting way to go on

      Software I use

      To create my panoramas I usually take the photos without a tripod and use AutoStitch (freeware) and PanoramaFactory (shareware $30) for the digital work.

      The Flexify filter module ($35) for Adobe PhotoShop creates polar panoramas on-the-fly and offers numerous projections for your photos.

      About the author

      Dirk Paessler is 37 and is hooked on photography since 20 years. Have a look at his photoblog. When he is not taking photos he works as the CEO of Paessler, a software company creating network monitoring software.

    How much of this blog did you find useful? Be honest!